Coming soon
Home Inventory Photos (HIP) maintains a home inventory of valuable items stored in the apps local home document directory on the device it is installed on and maintains a SQLite database of photos. The user can take multiple photos of the item, and multiple photos of the receipt, and enter the following information about the item: name, description, serial number, purchase price, date of purchase, and current location of item.
Enhancements added for version 3.0
Implemented ability to store multiple photos of an item and multiple photos of the receipt.
When version 3.0 is installed and ran for the first time a SQLite database and tables are created to store the photos.
When an existing version 2 is upgraded to version 3.0 all existing photos of items and receipts are moved to the SQLite database. The user can the add additional photos of the item and receipt.
Enhancements added for version 2.2.2
Implemented support on iPhones 6 and above for NFC (Near Field Communications) Tag reading and writing for the selected inventory item. NFC is similar to RIFD and is based on that technology. The NFC Tag 215 is the one supported by HIP, it allows for 504 bytes of data to be stored on a tag.
A new button has been added and enabled on the Home screen titled NFC_Tag. This button will allow the user to read a tag that has been written for the selected inventory item.
A new Screen has been added titled NFC Tag Scanner that allows scanning of a tag.
A new button has been added and enabled on the Scroll View Edit screen titled NFC_Tag. This button will allow the user to write data info to the tag for the selected inventory item.
A new Screen has been added titled NFC Tag Writer that allows writing to a tag.
Enhancements added for version 2.2.1
New multi select feature added to the Horizonal Scroll View Edit Screen. A new button has been added to the toolbar for the Horizonal Scroll View Edit Screen. The button title is Select to turn on the ability to select multiple items and Cancel to turn off multiple select and deselect any selected items. When Select feature is clicked any item selected in the horizonal scroll view will display a red checkmark in the upper left hand corner selecting the item again will unselect the item and checkmark is removed. Items selected can then be deleted or emailed if email feature has been purchased.
First time Application is run
The first time this app is run the you must sign in to app store.

Welcome screen – Displayed the first time the app is run.

This screen will not be displayed again and two actions can be taken from the welcome screen. You can go to the store to buy additional item storage or purchase the email feature which will allow you to send an email with an Inventory item photo and data. The Home screen identified as a List View will be displayed from this point on after pressing the Shop button or the + button to add an Inventory Item.
Actions to take:
- Click on the Shop button at the top or the appropriate blue text button at the bottom will load the in app purchases where you can purchase additional item storage or the email feature
- Click on the Plus “+” button at the top right side of the screen, or the blue text button at the bottom. This adds a new Inventory Item.
Shop In App Purchases Screen
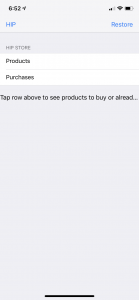
Here you can tap see the products that you can purchase, the products you have already purchased and restore the items you have purchased when reinstalling the app.
Tap on Products

This shows the products that are available for purchase.
Add Memory Limit For Slots – Allows you to add as many inventory items as the amount of memory your devices allows for the app.
Enable Email – Allows you to send the select inventory item Photo, Receipt and information to an email address.
Tap on Purchases
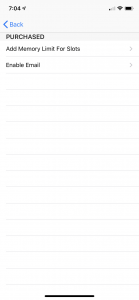
This shows that Memory Limit for the number of items has been purchased and the email feature has been purchased.
Click on Hip Button
Returns you to the previous screen.
Click on the Plus “+” button
The default number of inventory items that can be added without purchasing additional slots is 5. The “+” button will grayed out after you have entered 5 items. An additional 5 item slots or unlimited item slots can be purchased from In App Purchases by clicking on the Shop button.
A default placeholder image is displayed for the Inventory item until a photo of that item is taken.
Adding first Inventory item screen
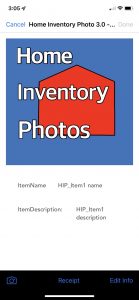
Default image is displayed as a placeholder, and default item name and
item description is assigned. The done button remains grayed out until some edit action is taken. When the done button is enabled you may save the item and return to the Home screen or the Horizonal Scroll View Edit screen.
When the cancel button is pressed item data is not saved you will be returned to previous screen (Home or Horizonal Scroll View Edit).
Actions to take:
- Click on the camera icon to take photos of the item
- Click on the Receipt icon to take a photos of a receipt
- Click on the Edit Info icon to enter info about the item.
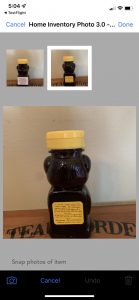
Take a Photo Screen – Displayed when camera icon is pressed
This screen has a horizontal scrolling view above the currently selected photo or the default
placeholder. This area will be blank if there are no photos of the item.

Actions to take:
- Click on the camera icon to take photos of the item
- Click on the Select icon to select multiple photos
- Click on trash can icon to delete selected photo(s)
- Click on the Cancel icon to undo selection of photos
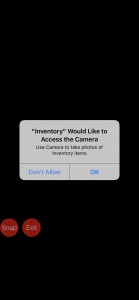
First time camera is icon is pressed you are prompted to allow this app to access the camera.
 I
I
Click the exit button to skip taking a photo, the app returns to the previous screen and displays the default image.
Click the snap button to take Inventory item photos, the app returns to the previous screen and displays the Inventory item photo in the horizontal scrolling view above the photo.


First photo of item taken and displayed in horizontal scrolling view above.
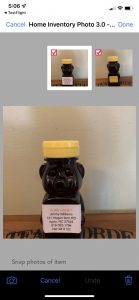
Click on Camera icon again to take next photo of item.

Click Camera icon and photo is displayed in horizontal scrolling view above.

Swipe right on selected photo to see previous photos

Click on the Select icon to select multiple photos. The Select icon will be replaced with the Cancel
icon to turn off multiple select and deselect the selected photos. A check mark is placed in the top
Left side of the photo to indicate it has been selected.
Click the trash can icon to delete selected photos.
Click the Cancel icon to deselect the selected photos, the Cancel icon is
changed to the Select icon.
Click the done button to return to the Edit item screen with new photos saved in temporary
storage. The first photo in the in the horizontal scrolling view is displayed as the item being edited.
The photos in temporary storage will be saved to permanent storage when done button is pressed to save the item. Clicking on the Camera icon again will display all photos of the item in permanent and temporary storage that can be deleted or new photos added.
Inventory Item Receipt Screen – take a photo of the receipt
Multiple photos can be taken of receipts using the same methods as described for taking photos
of the items.

Click on the camera icon to take a photo of the receipt, click on the done button to accept the new receipt or the cancel button to reject the photo.
You are returned to the previous menu.
Inventory Item Edit Screen – displayed when Edit Info icon is pressed
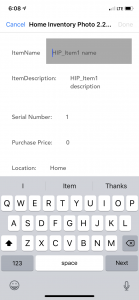
Start typing to replace the default data assigned, click on the next button on the keyboard to accept the default data or entered data. The highlight will move to the next field, and the done button will be enabled. Continue in the same manner until all data is entered.
Click done to accept the data in the fields, or press cancel to reject the data in the fields. You will return to the previous screen (Item Photo/Edit Info), Click the Done button to save the edited item information.
When items have been added the list of items will appear on the Home screen.
Home Screen – Home Inventory Photo – List View

Actions on this screen:
- Click on the Shop button in top left corner to go to the store to purchase more storage or email feature.
- Click on the + button to add a new Inventory Item.
- Click on an item in the list and you will load the Horizonal Scroll View Edit Screen.
- Click on Search Inventory to Enter search Criteria and select which data field to search on.
Toolbar actions on this screen:
Toolbar items disabled on this screen are enabled on the Horizonal Scroll View Edit Screen.
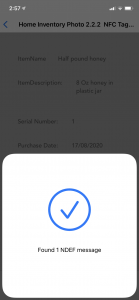
Click on NFC_Tag
Tag scanner screen is loaded
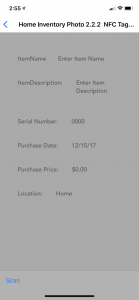
Click on the Scan button and place the iPhone on the tag to be scanned. Follow the instructions on the screen. Successful read will display the scanned info. Failure will display a failed message.
Click on Search Inventory
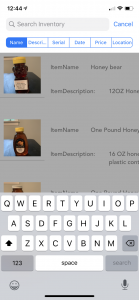
Select the data field to be searched, then enter the search criteria in the search field. The Inventory Items that contain the search criteria will be filtered in the list. Click on an item in the list and the Horizonal Scroll View Edit screen will be loaded with the filtered items in the list.
Click on an item in the list and you will load the Horizonal Scroll View Edit Screen.
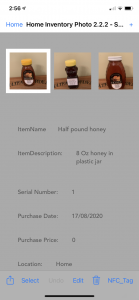
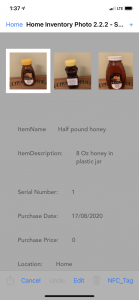
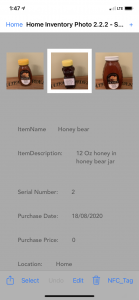
Horizonal Scroll View Edit
Here you can scroll the inventory items horizontally and select one of the
photo items to see the info stored for that item. Here you can delete an
Inventory item, edit an inventory item or email the inventory item if you
have purchased the email feature. You can undo the delete of an
inventory item until you return to the home screen or exit the app. When you go to the home screen or exit the app the inventory items deleted will be permanently removed from the data storage file and the data cannot be restored.
To edit the data for an Inventory Item select it and click on the Edit button. This will take you to the same screen as add an Inventory Item.
The Home button will return you to the List view. On the List view you can
add a new Inventory Item, select an Inventory Item to go to the Scroll View
Screen. Tool bar items are grayed out and are only enabled on the Horizonal Scroll View Screen for editing.
Version 2.2.1 adds a new button to the toolbar, the Select button. When the Select button is clicked the user can now select multiple items by clicking on the photo image in the Horizonal Scroll View. A red check mark will appear in the upper left corner of the photo. The Select button will be changed to a Cancel button so that the user can turn off Multiple select, and all selected items will be unselected, and check mark removed from photo of items selected when the Cancel button is clicked. The Cancel button will be replaced with the Select button on the toolbar.
Multiple selected items can then be deleted, or emailed. Deleted items can be undeleted one at a time. Multiple selected items will be emailed as a Pdf.
Click on the Select button
The Select button title is changed to Cancel, and you can now select multiple inventory items.
Selected inventory items display a red checkmark in the upper left hand corner of the photo. Selected items can be deleted by clicking on the trashcan icon in the toolbar. The undo button will be enabled and you can then undelete items one at a time.

Click on the Cancel button
The Cancel button title is changed to Select and all selected inventory items are unselected and the checkmark is removed from the photo.
Click on the Plus “+” button
Adds a new Inventory item, the same screen a the above Adding first Inventory item screen.
Click on the Home button
Returns you to the home screen titled Home Inventory Photo and displays the Inventory items in a vertical table view.
Toolbar actions on this screen:
- Send email – first icon on the toolbar at the bottom of the screen
- Undo – second icon on the toolbar undo delete of inventory item
- Edit – edit the data fields, replace the photo, replace the receipt
- Trash Can – delete the inventory item
Send email:
This icon is enable when you purchase the email feature in the Shop. Clicking this icon will load the selected Inventory item into an email and will be sent to the email address entered in the to field when send button is pressed. The Item photo, receipt and data stored for the item will be included in the email. You can cancel the email if desired.
Undo:
This icon is enable when you have deleted one or more items from the Scroll View. Clicking this icon will undo the deleted items and redisplay them. The undo starts with most recent deleted item. The Undo is only available while in the edit view, all deleted items are trashed when you return to the home screen or exit the app.
Edit:
This icon is enabled if there is an Inventory item selected in the scroll view. Clicking on this icon will load the Inventory item editing screen as described above in Adding the first Inventory item. The item photo and receipt can be taken or replaced, and the item info can be edited. Default info is provided for every new item added by using count of inventory items for the name, description and serial number.
Trash Can:
The selected inventory item is deleted from the display and can be added back by clicking the Undo button. The item is trashed when you return tp the Home screen or exit the App.
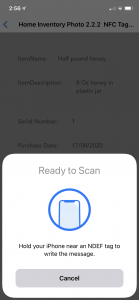
NFC_Tag:
The NFC Tag writer screen is loaded

Click on the Write button and place the iPhone on the tag. Follow the instructions on the screen. Successful write will display successful. Failure will display a failed message.
The selected inventory item is deleted from the display and can be added back by clicking the Undo button. The item is trashed when you return tp the Home screen or exit the App.